
Laser Pro Training Manual: A Comprehensive Guide (Updated 03/25/2026)
Updated March 25th, 2026 at 22:53:04, this manual provides comprehensive training for Laser Pro systems, ensuring safe and efficient operation for all users․

Welcome to the world of Laser Pro systems! These cutting-edge machines represent a significant advancement in material processing, offering precision and versatility for a wide range of applications․ This section introduces you to the core principles behind Laser Pro technology and its capabilities․
Laser Pro systems are designed for both engraving and cutting, accommodating materials like acrylic, wood, and even certain metals․ Understanding the system’s potential is crucial for maximizing productivity and achieving optimal results․ This training manual, updated on 03/25/2026 at 22:53:04, will guide you through every aspect of operation, from initial setup to advanced techniques․ We will emphasize safety protocols and best practices to ensure a secure and efficient working environment․ Prepare to unlock the full potential of your Laser Pro system!
What is Laser Pro Technology?
Laser Pro technology utilizes a focused beam of light to precisely interact with materials․ This interaction can either vaporize the material (cutting) or alter its surface (engraving)․ The process is controlled by sophisticated software, allowing for intricate designs and repeatable results․ As of 03/25/2026 at 22:53:04, Laser Pro systems employ various laser types, each suited for specific materials and applications․
The key advantage of Laser Pro technology lies in its non-contact nature, minimizing material distortion and enabling high precision․ It’s a versatile solution for prototyping, production, and customization․ Understanding the underlying principles – wavelength, power, and speed – is essential for effective operation․ This manual will delve into these concepts, providing a solid foundation for mastering Laser Pro technology and maximizing its potential within your workflow․
Core Components of a Laser Pro System
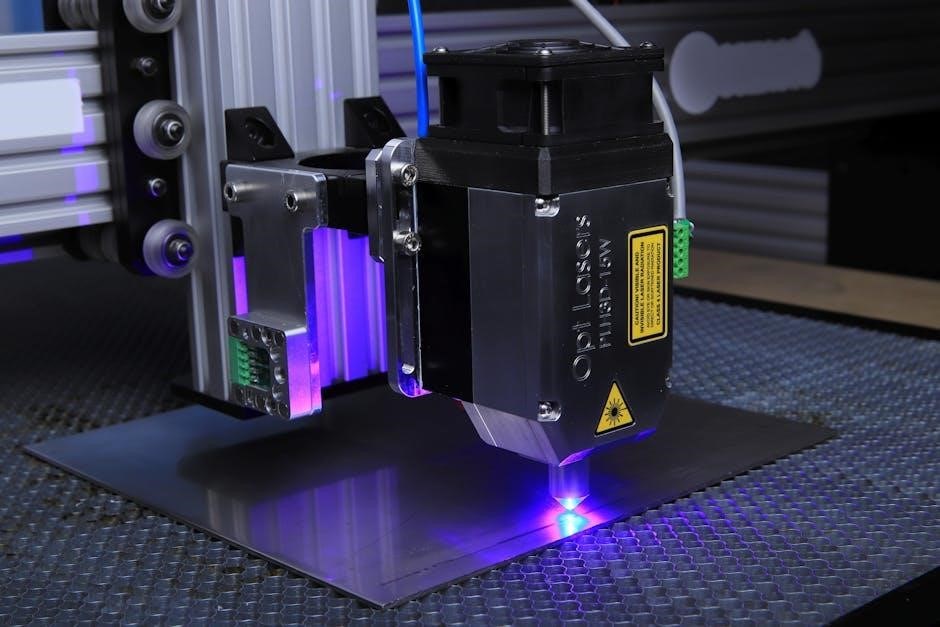
A Laser Pro system comprises several key components working in harmony․ The laser source (updated 03/25/2026 at 22:53:04) generates the beam, while the optics – lenses and mirrors – focus and direct it․ A precision motion control system, including motors and rails, ensures accurate positioning․ The work bed securely holds the material during processing;
Crucially, the system includes a robust exhaust system to remove fumes and debris, maintaining a safe working environment․ The control panel and software interface allow for parameter adjustments and job management․ Finally, safety interlocks prevent operation when the enclosure is open․ Familiarity with each component’s function is vital for optimal performance, troubleshooting, and preventative maintenance, as detailed throughout this training manual․

Laser Safety Fundamentals
(Updated 03/25/2026 22:53:04) Prioritizing safety is paramount when operating Laser Pro systems; understanding hazards and implementing proper procedures is absolutely essential․
Laser Classification and Hazards
(Updated 03/25/2026 22:53:04) Laser Pro systems utilize varying laser classes, each presenting unique hazards․ Class 1 lasers are inherently safe, while Class 3B and 4 lasers pose significant risks, including potential burn injuries to skin and eyes․
Direct or reflected beams can cause damage․ Understanding these classifications is crucial for selecting appropriate safety measures․ Hazards extend beyond the beam itself; plume emissions during material processing can contain hazardous particles․ Proper ventilation and respiratory protection are vital․ Furthermore, electrical hazards associated with the system must be addressed through regular inspections and adherence to safety protocols․ Always assume a laser system is active and potentially hazardous․
Personal Protective Equipment (PPE) for Laser Operation
(Updated 03/25/2026 22:53:04) Mandatory PPE is paramount when operating Laser Pro systems․ Specifically, laser safety eyewear, correctly rated for the laser’s wavelength and power, is non-negotiable․ This protects against direct and reflected beams․
Additionally, appropriate clothing, such as long sleeves and pants, minimizes skin exposure․ In certain applications, particularly those generating fumes, respiratory protection – a properly fitted respirator – is essential․ Gloves may be required when handling materials post-processing․ Regular inspection of PPE for damage is critical․ Remember, PPE is your last line of defense; proper system controls and adherence to safety procedures are the primary safeguards․
Laser Safety Procedures & Emergency Protocols
(Updated 03/25/2026 22:53:04) Strict adherence to established laser safety procedures is crucial․ Always post warning signs indicating laser operation․ Never operate the Laser Pro system without proper training and authorization․ Before operation, verify all safety interlocks are functional․
In case of an emergency – such as a fire or beam misalignment – immediately power off the system and activate the emergency stop․ Evacuate the area and alert designated safety personnel․ Familiarize yourself with the location of fire extinguishers and first aid kits․ Regular safety audits and drills are vital to ensure preparedness․ Report any safety concerns or incidents promptly to maintain a secure working environment․
Laser Pro System Operation
(Updated 03/25/2026 22:53:04) This section details the correct procedures for operating the Laser Pro, covering startup, material processing, and safe shutdown protocols․
Powering On/Off and System Checks
(Updated 03/25/2026 22:53:04) Proper system initialization is crucial for safe and effective laser operation․ Begin by verifying the emergency stop button is accessible and functioning correctly․ Power on the main control panel, then the laser power supply, allowing each component to complete its self-test sequence․
Next, inspect the cooling system – water levels and pump operation – to ensure adequate temperature regulation․ Confirm the air assist is active and delivering consistent airflow․ Before initiating any job, perform a dry run with low power to verify alignment and material positioning․ Finally, always follow the documented shutdown procedure, powering down components in the reverse order of startup to prevent damage․
Material Compatibility & Settings
(Updated 03/25/2026 22:53:04) Laser Pro systems can process a wide range of materials, but compatibility and optimal settings vary significantly․ Acrylic, wood, and certain metals are commonly used, however, PVC and materials containing chlorine must be avoided due to hazardous fume production․
Power settings, speed, and frequency directly impact the engraving or cutting quality․ Refer to the material database within the Laser Pro software for pre-defined settings as a starting point․ Always perform test cuts on scrap material to fine-tune parameters․ Consider material thickness, density, and desired outcome when adjusting settings․ Incorrect settings can lead to material damage or poor results․
Focusing and Alignment Procedures
(Updated 03/25/2026 22:53:04) Precise focusing is crucial for optimal laser performance․ Utilize the Laser Pro’s auto-focus feature as a starting point, then manually refine using the focus gauge․ A sharp, small dot indicates correct focus․ Incorrect focus results in blurry engravings or incomplete cuts․
Alignment ensures the laser beam accurately follows the intended design path․ Before each job, verify alignment using the red dot pointer․ Adjust mirrors as needed, following the system’s calibration guide․ Misalignment leads to inaccurate results and potential damage․ Regularly check alignment, especially after system movement or maintenance․ Proper alignment maximizes precision and efficiency․

Software & Control Interface
(Updated 03/25/2026 22:53:04) Mastering the Laser Pro software is key to unlocking its full potential, enabling precise control over designs and laser parameters․
Navigating the Laser Pro Software
(Updated 03/25/2026 22:53:04) The Laser Pro software interface is designed for intuitive operation, though familiarity requires practice․ Upon launching, you’ll encounter the main toolbar, providing access to essential functions like importing, editing, and job management․ The workspace displays your design, allowing for real-time adjustments․
The right-hand panel houses material settings and laser power controls․ Explore the ‘Job’ menu for options related to file processing and output․ Utilize the ‘Help’ section for detailed explanations of each feature․ Regularly saving your work is crucial․ Understanding the layer system is vital for complex designs, enabling selective processing․ Remember to always double-check your settings before initiating a job․
Importing & Editing Designs
(Updated 03/25/2026 22:53:04) The Laser Pro software supports various file formats, including AI, SVG, DXF, and PLT․ Importing is straightforward – simply select ‘File’ then ‘Import’․ Once imported, designs can be scaled, rotated, and repositioned using the intuitive tools․ Editing features allow for node manipulation, path creation, and text addition․
Boolean operations (union, difference, intersection) are essential for complex shapes․ Utilize the software’s alignment tools for precise positioning of elements․ Remember to convert text to outlines before processing to avoid font compatibility issues․ Always verify design integrity after editing, ensuring clean lines and closed paths for optimal laser performance․ Saving frequently is highly recommended․
Job Setup and Parameter Optimization
(Updated 03/25/2026 22:53:04) Proper job setup is crucial for successful laser processing․ Begin by defining the material type within the software, as this dictates initial power and speed settings․ Adjust power based on desired depth and material thickness; higher power equals deeper engraving or cutting․ Speed controls the processing rate – slower speeds offer precision, while faster speeds increase throughput․
Frequency (PPI/DPI) impacts detail resolution․ Experiment with settings on test pieces to find the optimal balance between quality and speed․ Consider lens focal length and air assist pressure for clean results․ Always preview the job path before execution to identify potential issues․ Save optimized parameter sets for future use, streamlining workflow․
Maintenance & Troubleshooting
(Updated 03/25/2026 22:53:04) Regular maintenance ensures peak performance and longevity of your Laser Pro system․ Prompt troubleshooting minimizes downtime and maximizes productivity․
Routine Cleaning and Maintenance
(Updated 03/25/2026 22:53:04) Consistent cleaning is vital for optimal Laser Pro performance․ Daily, inspect the laser head for debris and gently clean the lens with approved optics wipes – avoid harsh chemicals! Weekly, vacuum the machine bed to remove material remnants․ Monthly, thoroughly clean the exhaust system, checking for blockages that reduce airflow․
Inspect belts and rails for lubrication, applying a silicone-based lubricant as needed․ Regularly check coolant levels (if applicable) and top up with the recommended fluid․ A preventative approach to maintenance, following the schedule, significantly reduces the risk of unexpected downtime and extends the lifespan of your Laser Pro system, ensuring consistent, high-quality results․
Common Issues and Solutions
(Updated 03/25/2026 22:53:04) Encountering issues is normal․ A frequent problem is inconsistent engraving depth; this often stems from improper focusing – re-check alignment procedures․ Smoke smell despite proper ventilation indicates potential material incompatibility or insufficient airflow; adjust settings or material choice․ “Laser not firing” can be due to software connection issues, power supply problems, or a faulty laser tube – verify connections and power․
For error messages, consult the software documentation․ Regularly backing up your designs prevents data loss․ If issues persist, contact qualified Laser Pro support․ Documenting the problem, steps taken, and error codes will expedite the troubleshooting process, minimizing downtime and maximizing productivity․
Preventative Maintenance Schedule
(Updated 03/25/2026 22:53:04) Consistent preventative maintenance extends the lifespan of your Laser Pro system․ Daily: Clean the lens and bed after each use to remove debris․ Weekly: Inspect the cooling system for leaks or blockages; ensure proper fluid levels․ Monthly: Thoroughly clean the exhaust system, checking for obstructions․
Quarterly: Calibrate the laser alignment and test the emergency stop functions․ Annually: Professional inspection of the laser tube and power supply is crucial․ Maintain a log of all maintenance activities․ Following this schedule minimizes downtime, optimizes performance, and ensures continued safe operation of your Laser Pro system, protecting your investment․

Advanced Techniques & Applications
(Updated 03/25/2026 22:53:04) Explore advanced engraving and cutting methods, material-specific settings, and innovative applications to maximize your Laser Pro’s potential․
Engraving vs․ Cutting with Laser Pro
(Updated 03/25/2026 22:53:04) Understanding the fundamental differences between engraving and cutting is crucial for optimal Laser Pro operation․ Engraving removes a shallow layer of material, creating a design on the surface, utilizing lower power and higher speed settings․ This is ideal for personalization and detailed imagery․
Conversely, cutting completely penetrates the material, separating it into distinct pieces․ This requires higher power and slower speeds, carefully adjusted based on material thickness and type․ Improper settings can lead to scorching or incomplete cuts․ Mastering these distinctions allows for versatile project creation, maximizing the Laser Pro’s capabilities and ensuring consistently high-quality results․ Always test settings on scrap material first!
Working with Different Materials (Acrylic, Wood, Metal)
(Updated 03/25/2026 22:53:04) Laser Pro systems offer versatility, but material-specific settings are vital․ Acrylic generally requires moderate power and speed, with ventilation to manage fumes․ Wood demands varied settings based on density – softer woods engrave easily, hardwoods need higher power for cutting․
Metal engraving often necessitates specialized coatings or higher wattage lasers․ Always prioritize material safety data sheets (MSDS) to understand potential hazards and required ventilation․ Testing is paramount; start with low power and gradually increase until desired results are achieved․ Incorrect settings can cause fire, damage the material, or compromise laser performance․ Proper material selection and parameter adjustment are key to success․